Pillow (PIL module) demonstrations
Emily Dumas
Importing the module
import PIL
Loading
# Let's open a JPEG photo
# This is a resized version of the photo from https://unsplash.com/photos/iHOZTi2niV4
# which is licensed for use without attribution, and allows modification.
img = PIL.Image.open("pillow-photo.jpg")
img
Converting
# To grayscale
# Note: .convert returns a new image
img_gray = img.convert("L")
img_gray.save("pillow-photo-gray.png")  # Write grayscale version to a PNG file
img_gray
# To black and white (1-bit)
img_bw = img.convert("1",dither=PIL.Image.NONE)
img_bw
# To black and white (1-bit)
# Without passing `dither=PIL.Image.NONE`, it uses patterned black/white pixels
# to give the impression of shades of gray.  This is called dithering.
# Your browser may resize the image a bit (making it smaller) resulting in some
# *actual* gray pixels being shown.
img_bw = img.convert("1")
img_bw
Cropping
# crop returns a new image
img_portion = img.crop( (85,52,245,200) )  # 4-tuple is (left_x, top_y, right_x, bottom_y)
img_portion
# Check the size of the cropped portion
w,h = img_portion.size
w,h
Resizing
# Resize returns a new image; it isn't a mutation!
w,h = img_portion.size
img_portion.resize( (3*w,int(1.5*h)) ) # (new width, new height)
# This is 3 times as wide, 1.5 times as tall
# Dimensions must be integers
Rotating and mirroring
img.transpose(PIL.Image.FLIP_LEFT_RIGHT)
img.transpose(PIL.Image.FLIP_TOP_BOTTOM)
img.transpose(PIL.Image.ROTATE_90)
Other supported flips/rotations:
PIL.Image.FLIP_LEFT_RIGHTPIL.Image.FLIP_TOP_BOTTOMPIL.Image.ROTATE_90PIL.Image.ROTATE_180PIL.Image.ROTATE_270PIL.Image.TRANSPOSEPIL.Image.TRANSVERSE
New blank image
# arguments to Image.new are:  mode, size, color
canvas = PIL.Image.new( "RGB", (500,500), (255,150,230) )
canvas
Pasting
# recall img_portion is the cropped pillow image

# paste modifies the image it is called on; it is a mutation
canvas = PIL.Image.new( "RGB", (500,500), (255,150,230) )
canvas.paste(img_portion, (20,20))  # dest.paste(src, upperleft_coords)
canvas
w,h = img_portion.size
canvas.paste(img_portion, (500-w-20,20))
canvas.paste(img_portion, (20,500-h-20))
canvas.paste(img_portion, (500-w-20,500-h-20))
canvas
canvas.paste(img_portion.resize( (500-20-20,h) ), (20,(500 - h)//2) )
canvas
Per-pixel color setting
canvas = PIL.Image.new( "RGB", (256,256) )
for x in range(256):
    for y in range(256):
        red = 255 - (x*y)//16 % 256 # bands of red along hyperbolas x*y=const
        green = y
        blue = 255 - ((256-x)*y) // 16 % 256 # bands of blue along hyperbolas (256-x)*y=const
        canvas.putpixel( (x,y), (red,green,blue) )
canvas
# Another nice color pattern
for x in range(256):
    for y in range(256):
        red = 255-x
        green = 255-y
        blue = 255 - ((x*y // 16) % 256)
        canvas.putpixel( (x,y), (red,green,blue) )
canvas
Drawing a random walk
# First version: Just show every place the walk visits
import random

canvas = PIL.Image.new( "RGB", (256,256), (255,255,255) )
x=128
y=128
pathcolor=(128,192,255)
for i in range(20000):
    try:
        canvas.putpixel((x,y),pathcolor)
    except IndexError:
        break
    dx,dy = random.choice([(-1,0),(1,0),(0,-1),(0,1)])
    x += dx
    y += dy
canvas
# Improved: Darken a pixel every time the walk steps on it
import random

canvas = PIL.Image.new( "RGB", (256,256), (255,255,255) )
x=128
y=128
for i in range(20000):
    try:
        r,g,b = canvas.getpixel( (x,y) )
        canvas.putpixel((x,y),(int(r*0.8),int(g*0.9),int(b*0.99)))
    except IndexError:
        break
    dx,dy = random.choice([(-1,0),(1,0),(0,-1),(0,1)])
    x += dx
    y += dy
canvas
Drawing a spiral
import random

canvas = PIL.Image.new( "RGB", (200,200), (255,100,100) )
x=10
y=10
steplen = 180
steps = 0
diridx = 0
directions = [ (1,0), (0,1), (-1,0), (0,-1) ]

while True:
    canvas.putpixel((x,y),(250,250,180))
    steps += 1
    if steps == steplen:
        steps = 0
        diridx = (diridx + 1) % 4
        steplen -= 10
        if steplen <= 0:
            break
    else:
        dx,dy = directions[diridx]
        x += dx
        y += dy
canvas.save("spiral.png") # save to a file
canvas
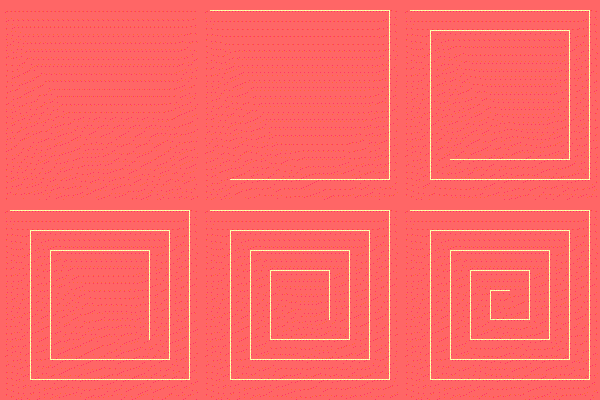
Animated spiral
import random

canvas = PIL.Image.new( "RGB", (200,200), (255,100,100) )
x=10
y=10
steplen = 180
steps = 0
diridx = 0
directions = [ (1,0), (0,1), (-1,0), (0,-1) ]
frames = []

while True:
    if steps == 0:
        frames.append(canvas.copy())
    canvas.putpixel((x,y),(250,250,180))
    steps += 1
    if steps == steplen:
        steps = 0
        diridx = (diridx + 1) % 4
        steplen -= 10
        if steplen <= 0:
            break
    else:
        dx,dy = directions[diridx]
        x += dx
        y += dy
frames[0].save("spiral.gif",save_all=True,append_images=frames[1:],loop=0,duration=100)
If you load a GIF with pillow and evaluate the object in a notebook cell, you'll only see the first frame. But here is the full animation created above (embedded here using the notebook environment's support for including images from files).

There are some weird dithering artifacts (red dots), which I think is due to standard GIF files only allowing 256 colors. Some other GIF creation programs may choose an adapted color palette (which would be great for our image, which only uses two colors) and/or take advantage of GIFs allowing a new palette for each frame.
The trouble with JPEGs
Never use JPEG for images with sharp boundaries between black and white regions, or between other contrasting colors. (In photographs, such a transition is always spread over a few pixels, at least.)
Let's make an image with complex detail and lots of sharp black-to-white transitions to demonstrate this.
cache = {0:1, 1:1}
def fact(n):
    if n in cache:
        return cache[n]
    res= n*fact(n-1)
    cache[n]=res
    return res

def binom(n,k):
    return fact(n) // (fact(k)*fact(n-k))

img = PIL.Image.new("L",(128,128),(255,))
for y in range(128):
    for x in range(y+1):
        t = 255*(1-(binom(y,x) % 2))
        img.putpixel((x,y), t)
img
# Save with "pretty good" quality setting for photos
img.save("gasket90.jpg",quality=90)
# Save with extreme space-saving quality setting
img.save("gasket10.jpg",quality=10)
PIL.Image.open("gasket90.jpg").resize((256,256))
# This one looks OK, but has a tiny bit of light gray around the sharp black lines
# We zoom in 200% to make details clear
PIL.Image.open("gasket10.jpg").resize((256,256))
# This one looks bad!  All sorts of weird gray stuff around the sharp black/white lines
# Critical image data was discarded.
# Again, we zoom in 200% to make details clear